Introduction
Gaps around a front door frame are one of the most common sources of cold draughts in UK homes. You may feel cold air around the sides of the frame, notice the hallway is always colder than the rest of the house, or find that the door area feels uncomfortable even when the door itself seems to shut properly.
The reason this problem matters is that door-frame gaps are often hidden in plain sight. Many people focus on the bottom of the door, the letterbox or the lock side seal, when the real issue is a gap between the frame and the surrounding wall, trim or internal edge. If those gaps are not sealed properly, cold air will keep finding its way in.
This guide explains how to identify the gap, choose the right sealing approach, and fix it safely without sealing the wrong thing. A quick gap-type section is included here because it helps separate simple decorator’s gaps from deeper frame-to-wall gaps that need a more substantial seal.
If your hallway or entrance area has several airflow problems rather than one obvious gap, How to Stop Draughts in Your Home (UK Guide) is the main hub guide for prioritising the biggest sources first.
Why This Happens
Gaps around front door frames usually appear for one of these reasons:
- the original sealing around the frame has shrunk or failed
- trim or caulk has cracked over time
- the frame was never sealed particularly well
- the surrounding wall has shifted slightly
- previous repairs were cosmetic rather than properly air-sealing
- movement, age or weather exposure have opened up the join
These gaps are particularly noticeable in winter because cold air moves through them continuously, even when the door itself looks fine.
Sometimes the problem is not the frame-to-wall gap but the actual door seal or hinge compression. If the draught seems to come from the door opening rather than the outer frame, How to Stop a Draught From a Front Door or How to Adjust uPVC Door Hinges to Stop a Draught may be more relevant than sealing the frame perimeter.
Tools or Materials You May Need
What you need depends on the size and type of gap, but common materials include:
- Decorator’s caulk for small internal trim gaps
- Flexible exterior sealant for appropriate external gaps
- Expanding foam for deeper hidden voids where suitable
- Scraper or knife for removing failed old sealant
- Vacuum or brush for dust removal
- Sealant gun
- Cloth and cleaner for prep
If the gap is deeper than a hairline crack and needs filling around the door or window perimeter, Best Expanding Foam for Door and Window Gaps is the most useful product guide for choosing the right type rather than using the first foam you find.
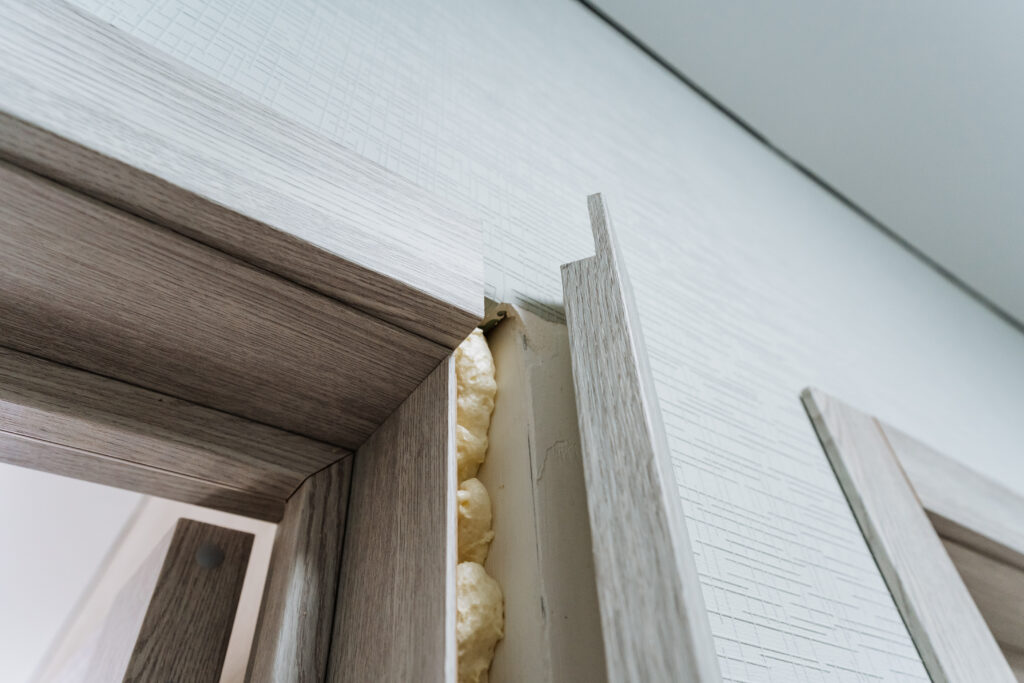
Identify the Type of Gap First
Before sealing anything, work out what kind of gap you have.
Small cosmetic gap
Usually between trim and plaster or along an internal edge. These are often best handled with caulk.
Frame-to-wall gap
A more meaningful gap between the actual door frame and the wall opening. These may need deeper filling and proper air sealing.
Door opening gap
Cold air is coming through the door shut line, not around the outer frame. That points to seals, hinges or alignment instead.
Localised damaged sealant
Old sealant has cracked, split or pulled away in only one section.
This matters because using light decorator’s caulk on a deeper structural frame gap often produces a tidy-looking repair that still leaks air.
Step-by-Step Fix
Step 1: Find the exact route of the draught
Do not start sealing until you are sure where the air is actually entering.
Check:
- both vertical sides of the frame
- the top of the frame
- the join between trim and wall
- the junction between frame and masonry
- whether the cold air is stronger when it is windy outside
If needed, use a cold hand test, tissue test or careful smoke test. If airflow is unclear, How to Identify Hidden Draughts in Your Home helps trace draught routes before you start filling random gaps.
Step 2: Remove failed old sealant or loose material
Any cracked, loose or separating material should come out before new sealant is applied. Otherwise the new repair may not bond properly.
Brush or vacuum out dust and debris so the new filler or sealant has a clean surface.
Step 3: Choose the right filler for the gap size
This is the step that determines whether the fix lasts.
For fine internal trim gaps
Use a decent decorator’s caulk or flexible internal filler.
For deeper frame-perimeter gaps
Use a more substantial filler approach where appropriate, often involving expanding foam behind a finished seal line.
For exposed external joints
Use a weather-suitable flexible exterior sealant if that is the correct application.
If you are unsure whether the gap around the window or door perimeter needs a more substantial product, Best Expanding Foam for Door and Window Gaps is the key buying guide.
Step 4: Seal the gap properly, not just cosmetically
Apply the chosen material neatly and fully so the air path is actually blocked.
For deeper voids, the aim is not only to make the edge look tidy. It is to stop air movement. That may mean filling the void properly first, then finishing the visible surface cleanly.
Step 5: Let it cure and recheck the draught
Once the repair has cured, recheck the area on a colder day or in windy conditions. If you still feel air movement, the original diagnosis may have been incomplete.
For example, the frame may now be sealed, but the door leaf itself may still be leaking around the shut line. In that case, How to Replace a uPVC Door Seal or Best Weatherstripping for uPVC Doors may be the more relevant next step.
Step 6: Check surrounding areas if the hall is still cold
Front door draughts often overlap. Even after sealing the frame, you may still have:
- poor threshold sealing
- letterbox leakage
- side or top door seal failure
- nearby floorboard draughts
If the entrance area still feels cold after sealing the frame, widen the diagnosis rather than assuming the repair failed.
When This Is Not a DIY Fix
You may need more than a simple DIY seal if:
- the frame appears loose or visibly moving
- there are major gaps caused by poor installation
- the surrounding wall is cracked or damaged
- water ingress is also occurring
- the frame is distorted rather than simply unsealed
- the issue is really in the door alignment or locking pressure
If the problem is actually the door failing to pull tightly into the seal, How to Stop a Draught From a Front Door is the better guide. And if the door has dropped slightly, How to Adjust uPVC Door Hinges to Stop a Draught may solve more than sealing ever will.
How to Prevent the Problem
To reduce the chance of the gaps reopening:
- inspect the frame edges each winter
- repair cracked sealant early
- keep exterior joints maintained
- deal with movement or alignment issues before they worsen
- do not rely on cosmetic filler for deeper air gaps
- check the whole door area, not just the most obvious visible crack
This matters especially in draught-prone homes where multiple smaller leaks combine to make the entrance area feel much colder than expected.
Quick Checklist Summary
- Confirm where the air is actually entering before sealing
- Separate trim gaps from deeper frame-to-wall gaps
- Remove failed old sealant and clean the area properly
- Use the right product for the gap size and location
- Block the air path, not just the visible crack
- Recheck for draughts after curing
- Investigate door seals or hinges too if the area is still cold
Related Guides
- How to Stop Draughts in Your Home (UK Guide)
- How to Stop a Draught From a Front Door
- How to Adjust uPVC Door Hinges to Stop a Draught
- Best Expanding Foam for Door and Window Gaps
- Why Sealing Draughts Can Reduce Condensation