Introduction
If cold air is getting in around your windows, the room feels uncomfortable even when the heating is on, or the rubber around the opening sash looks cracked, flattened or shrunk, replacing the window rubber seals can often make a noticeable difference.
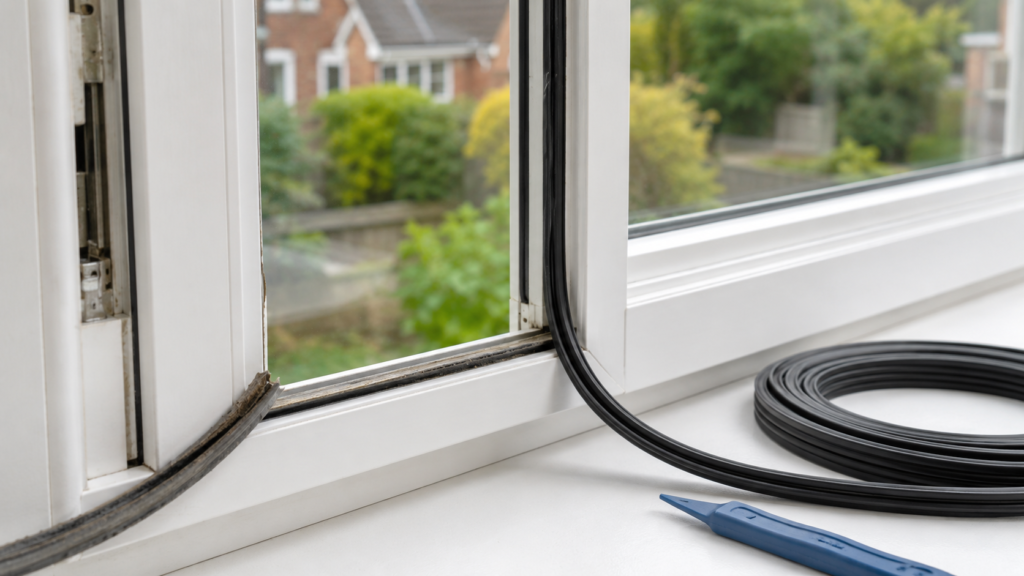
This is one of those jobs that sounds more technical than it usually is. On many uPVC windows, the seal simply pulls out and a new one presses back into the groove. The real challenge is not always fitting it. It is making sure the seal is actually the problem, choosing the right replacement profile, and fitting it neatly enough to create a proper seal rather than a frustrating half-fix.
This guide explains how to replace window rubber seals step by step, how to confirm the old seals are genuinely worn, and what mistakes to avoid. A quick seal-matching section is included because buying the wrong profile is one of the most common reasons this job goes wrong.
If you are not yet sure whether the draught is from the sash seal or somewhere else around the frame, How to Identify Hidden Draughts in Your Home should be read first.
Why This Happens
Window rubber seals wear out over time. On many UK homes, especially those with older uPVC windows, the gasket around the opening part of the window gradually becomes:
- flattened
- brittle
- shrunken
- split
- loose at corners
- less able to compress properly when the window shuts
Once that happens, the window may still close, but it no longer seals tightly enough against the frame. That can lead to:
- draughts around the opening edge
- cold spots near the window
- a room that feels harder to heat
- more moisture settling on colder glass
- general discomfort in windy weather
If you are still not certain the seal is the actual problem, How to Stop Draughts Around Windows helps separate failed rubber seals from frame-perimeter gaps and other cold air routes.
Tools or Materials You May Need
For most seal replacement jobs, you will need:
- Correct replacement window rubber seal
- Scissors or a sharp knife
- Cloth
- Mild cleaner
- Tape measure
- Old seal sample for profile matching
- Optional blunt tool for guiding seal into awkward corners
If you have not bought the new seal yet, Best Window Seal Replacement Kits (UK) is the most useful product guide for choosing a suitable gasket type rather than guessing from online photos.
Check the Seal Before You Replace It
Before pulling anything out, check whether the seal is genuinely worn.
Signs the seal is likely past its best include:
- visible cracking or splitting
- hardened sections that no longer feel flexible
- shrinkage at corners
- flattened shape where it should still feel rounded or springy
- cold air strongest around the opening sash
- paper test fails easily when the window is shut
If the seal still feels soft and intact, the problem may instead be hinge compression, alignment or perimeter sealing around the frame.
Step-by-Step Fix
Step 1: Confirm that the draught is around the opening sash
This matters more than many people expect.
A failed sash seal usually causes draughts around the part of the window that opens. A frame-perimeter gap, by contrast, usually causes cold air around the outer edge where the frame meets the wall.
Check around:
- the opening edge
- top and side shut lines
- bottom corners
- the sash itself when closed
If the cold air seems to come from the outer frame instead, this is probably not a seal-replacement-first job.
Step 2: Remove a small sample of the old seal first
Do not rip the whole thing out immediately.
Start by pulling out a short section from an unobtrusive area. This lets you:
- examine the seal profile
- check how it fits the groove
- confirm whether it is push-fit
- compare it against replacement options
This one small step prevents a lot of mistakes, especially when ordering replacements.
Step 3: Match the replacement seal properly
This is the most important buying decision.
You need to match:
- the profile shape
- the push-in foot or leg
- the general seal size
- the application
Common profiles may look very similar online, but small differences can affect fit badly. If you have not already sourced the replacement, compare your sample carefully rather than relying on vague “fits most uPVC windows” claims.
Step 4: Pull out the old seal fully
Once you have the new seal ready and the profile confirmed, remove the old seal steadily around the sash.
As you do this, watch for:
- stubborn sections
- corners where the seal has shrunk
- debris in the groove
- signs that the seal was previously repaired badly
You do not need to rush. A clean removal usually makes the refit easier.
Step 5: Clean the groove
Before installing the new seal, wipe the groove out properly.
Remove:
- dust
- loose fragments
- old dirt
- any bits of degraded rubber
A clean groove gives the new seal a much better chance of sitting properly and sealing consistently.
Step 6: Press the new seal into place
Start at a sensible point and push the new seal in evenly. Avoid stretching it as you go.
That last point is important. If you stretch the gasket during fitting, it may shrink back later and leave gaps at corners or ends.
Work steadily around the window, pressing it into the groove rather than forcing it. Use a blunt tool only if needed for awkward spots, and take care not to damage the new rubber.
Step 7: Cut neatly and avoid tension at corners
Once you reach the end, cut the seal neatly so it sits snugly without bunching or being stretched.
Corners matter here. Poor corner finishing is one of the most common ways a replacement job ends up looking acceptable but still leaking air.
Step 8: Close the window and test the seal
Once the gasket is in place, shut the window and check:
- whether it closes cleanly
- whether compression feels even
- whether the sash now seals better
- whether the draught has reduced
- whether the paper test feels firmer than before
If the window becomes notably harder to shut or the seal looks twisted, recheck the profile and fitment.
When This Is Not a DIY Fix
You may need a different solution if:
- the window is misaligned
- the hinges are no longer pulling the sash in properly
- the frame itself is loose or damaged
- the draught is from perimeter gaps, not the sash
- the glazed unit has failed or other hardware faults are present
In those cases, a new rubber seal may help a little but will not solve the main issue.
If the room is also suffering from cold air lower down or in unrelated parts of the wall, How to Stop Cold Air Coming Through Floorboards can be relevant because not every “window draught” is only a window issue.
How to Prevent the Problem
Once you replace the seal, help it last longer by:
- cleaning the window edges periodically
- checking for shrinkage or damage each winter
- dealing with draughts early before the seal fully fails
- avoiding forcing the window shut against damaged hardware
- maintaining the broader window condition, not just the gasket
If you are doing several windows through the house, How to Stop Draughts in Your Home (UK Guide) is worth using as the broader plan rather than treating each cold spot in isolation.
Quick Checklist Summary
- Confirm the draught is from the opening sash before replacing the seal
- Remove a short sample first so you can match the profile correctly
- Do not guess the gasket type from a generic product photo
- Clean the groove before fitting the new seal
- Press the new seal in without stretching it
- Take extra care at corners and end cuts
- Test the window once fitted to confirm better compression and less airflow
Related Guides
- How to Stop Draughts in Your Home (UK Guide)
- How to Stop Draughts Around Windows
- How to Identify Hidden Draughts in Your Home
- Best Window Seal Replacement Kits (UK)
- How to Stop Cold Air Coming Through Window Gaps
- How to Stop Condensation on Windows