Introduction
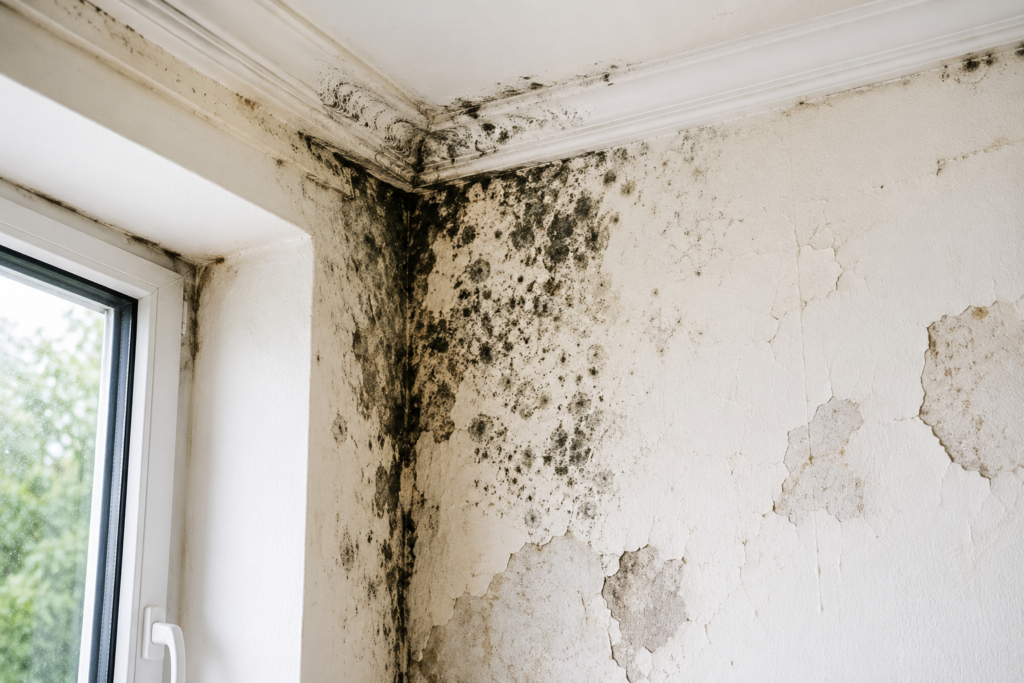
Most household mould is not evidence that the structure of the building is failing. In many UK homes, black mould is caused by condensation: warm humid air repeatedly reaches a cold wall, window or ceiling surface and leaves enough moisture for mould to grow.
There are situations, however, where mould is a warning sign of a deeper building problem.
If a wall stays wet, plaster is breaking down, staining follows rainfall, timber is deteriorating, or mould repeatedly returns in exactly the same place despite sensible humidity control, the moisture may be coming from the building rather than simply from the air inside it.
The important thing is to distinguish surface mould from evidence of an underlying defect. This guide explains the signs that suggest mould may be connected to a structural or building-fabric problem, what you can safely check yourself, and when cleaning and ventilation are no longer enough.
For the wider condensation picture, How to Stop Condensation on Windows is the main FixItSimple hub. If you first need to decide whether the water source is condensation or a leak, How to Tell If Mould Is Caused by Condensation or a Leak should be your starting point.
Why This Happens
Mould grows where moisture remains available. In a straightforward condensation problem, that moisture comes mainly from humid indoor air.
A more serious building problem can keep feeding moisture into the same location regardless of how well you ventilate the room.
Possible causes include:
- roof leaks
- defective gutters or downpipes
- failed external pointing or render
- damaged window or door perimeter sealing
- plumbing leaks
- water ingress around roof or wall junctions
- defective damp-proofing arrangements
- persistent moisture affecting structural timber
Not all of these are technically “structural failure”. A leaking gutter is a building defect rather than a failing structure, for example. But to the homeowner, the important distinction is the same: mould caused by water entering or remaining within the building fabric cannot be solved by repeatedly spraying the visible surface.
Tools or Materials You May Need
For an initial inspection, useful items include:
- torch
- hygrometer
- camera or phone
- pencil or removable marker for tracking the edge of a damp patch
- disposable gloves
- clean tissue or cloth
- access to the loft if safe and relevant
Do not start opening walls or lifting floors simply because you see mould. Begin with non-destructive checks.
If the mould is clearly on a washable window surface rather than within damaged building materials, Best Mould Remover Spray for Window Frames (UK) may be useful for surface cleaning while you address the moisture source.
Step-by-Step Fix
Step 1: Decide whether the mould follows a normal condensation pattern
Condensation mould commonly appears:
- in external-wall corners
- around window frames
- behind furniture
- on cold bedroom walls
- on bathroom ceilings
- mainly during winter
It often exists alongside:
- wet windows
- high indoor humidity
- poor airflow
- indoor clothes drying
- limited extraction
If that describes the pattern, a structural defect is less likely.
For corner-specific mould, What Causes Black Mould in Corners of Rooms? explains why cold junctions and restricted airflow create common mould patches without necessarily indicating building damage.
Step 2: Look for permanent dampness
A structural or fabric-related moisture problem becomes more likely when the surface remains wet regardless of ordinary indoor conditions.
Ask:
- Is the patch wet during mild, dry weather?
- Does it stay damp even after the room has been ventilated?
- Is it confined to one specific location?
- Does it worsen after rain?
Condensation usually varies strongly with temperature, humidity and season. Direct water ingress often follows a more localised pattern.
Step 3: Look for water staining
Mould alone is not enough to diagnose the cause.
More concerning signs include:
- yellow staining
- brown tide marks
- streaks from above
- darkened plaster that remains damp
- repeated marks in exactly the same position
A stain below a bathroom, roof junction or external gutter deserves more investigation than a few black mould spots behind a wardrobe.
Step 4: Check the condition of the plaster
Surface mould can sit on otherwise solid plaster.
A deeper moisture problem may cause:
- blistering paint
- flaking finishes
- softened plaster
- crumbling material
- hollow or damaged areas
- wallpaper lifting repeatedly
If the building material itself is deteriorating, cleaning the surface is no longer the whole job.
Step 5: Check whether rainfall changes the problem
If mould or dampness becomes worse after prolonged rain, look at what is outside or above that section of wall.
Possible issues include:
- overflowing guttering
- cracked render
- defective pointing
- damaged roof coverings
- failed seals around windows
- roof-to-wall junction problems
Do not automatically assume the wall needs major structural work. Sometimes the cause is a relatively local external defect. But the moisture source still has to be fixed before the mould treatment will last.
Step 6: Consider plumbing routes
A damp patch near:
- a bathroom
- radiator pipes
- a shower
- basin plumbing
- a toilet
- pipe boxing
may have a plumbing cause.
The same applies to ceilings below bathrooms.
Step 7: Look for timber deterioration
Where mould is associated with timber, pay particular attention to:
- persistent softness
- obvious rot
- cracking or deterioration
- long-term moisture staining
- movement that was not there before
Surface mould on painted timber is not automatically structural rot. But timber that has remained wet for a long period deserves proper assessment, particularly if it contributes to the building fabric.
Step 8: Compare the mould with the rest of the room
A useful diagnostic question is whether the mould is part of a general room problem or an isolated defect.
If you have:
- several cold corners affected
- wet windows
- mould behind furniture
- high humidity
condensation is the more obvious explanation.
If you have:
- one concentrated wet patch
- otherwise normal humidity
- no condensation elsewhere
- repeated local staining
look harder for a direct moisture source.
Step 9: Improve humidity anyway while investigating
Even where a building defect is suspected, high indoor humidity can worsen the visible mould.
Use extraction, ventilate sensibly and avoid adding unnecessary moisture while the underlying issue is investigated.
If the house is generally humid, How to Reduce Humidity in a House Naturally gives the best first-line changes. Where active moisture reduction is genuinely needed, Best Dehumidifier for Condensation in UK Homes is the relevant buying guide.
A dehumidifier can help dry a space, but it should not be used as an excuse to ignore water still entering the building.
When This Is Not a DIY Fix
This is the most important section of the guide.
Professional investigation becomes sensible when you find:
Persistent water ingress
If a wall or ceiling repeatedly gets wetter after rainfall or plumbing use, the source needs to be found and repaired.
Significant plaster deterioration
Soft, crumbling or repeatedly failing plaster points to a longer-term moisture problem.
Suspected structural timber damage
Where joists, roof timbers or other important timber components appear persistently wet, softened or degraded, obtain appropriate professional advice.
Large or rapidly spreading damp areas
A growing damp patch deserves investigation rather than repeated cosmetic treatment.
Problems that remain after sensible condensation control
If you have:
- reduced humidity
- improved ventilation
- maintained reasonable temperatures
- cleared furniture from the wall
and the same localised damp patch still returns, the odds of another moisture source increase.
Uncertainty about the cause
It is often cheaper to diagnose a building problem correctly than to repeatedly buy mould treatments, repaint damaged walls and run a dehumidifier indefinitely.
The aim is not to panic because mould exists. It is to recognise the point at which the moisture source requires more than household maintenance.
How to Prevent the Problem
Prevention depends entirely on the cause.
For condensation-related mould
Focus on:
- ventilation
- humidity reduction
- consistent room temperature
- airflow behind furniture
- removing visible condensation
- dealing with cold draughts sensibly
For leaks and building defects
Fix the water source first.
That may mean:
- gutter or roof repair
- plumbing repair
- resealing an external opening
- repairing damaged exterior finishes
- addressing persistent building-fabric moisture
Only after the source is controlled should you treat and redecorate the affected interior.
Monitor repaired areas
After a repair, photograph the area and keep an eye on:
- renewed staining
- returning mould
- deterioration in paint or plaster
- changes during heavy rain
A problem that remains dry through the conditions that previously triggered it is much more likely to have been properly solved.
Quick Checklist Summary
- Most household mould is caused by condensation, not structural failure.
- Persistent local wetness deserves more investigation.
- Brown or yellow staining can indicate water ingress.
- Soft or crumbling plaster suggests a deeper moisture problem.
- Damp that worsens after rain points away from ordinary condensation.
- Plumbing routes should be considered where the location makes sense.
- Structural timber that remains wet or deteriorates needs proper assessment.
- A dehumidifier may reduce symptoms but cannot repair a leak or building defect.
- Fix the moisture source before redecorating.